Category Archives: Books

The Yangtze Incident 1949 – Britain’s Last War in China

‘Am Under Heavy Fire’

Suddenly we saw a line of splashes rip across the water just astern of us, followed by an inoffensive pop, pop, pop, popping noise. Bater gasped “I’m scared P.O.” and doing my best not to look scared said, “That makes two of us.’

On the open bridge of the sloop HMS Amethyst, Lieutenant-Commander Bernard Skinner raised his binoculars and searched the banks of the wide Yangtze River, his Chinese river pilot calling out small course corrections to avoid the many sandbars and navigation hazards. Skinner’s other officers also scanned the banks, all looking for the origin of the artillery shells that tore overhead with a whine or threw up great geysers of water close to the ship.

The Amethyst was on her way to Nanking from Shanghai, wending her way along China’s greatest river as her predecessors had been doing for over a hundred years. It was April 1949 and China was in the grip of a horrific civil war. Britain’s position in the Middle Kingdom was extremely unsteady.

Richard Todd, centre, starred in The Yangtse Incident which dramatised the post-war operation. Picture: contributed
Richard Todd, centre, starred in The Yangtse Incident which dramatised the post-war operation.

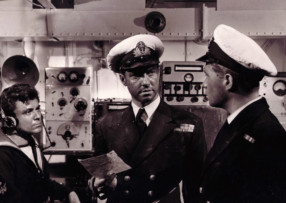
Skinner turned to his second-in-command: “No. 1, action stations.’ The young lieutenant quickly relayed the command, the ship’s electric warning bell ringing insistently as all hands ran to their assigned posts, the gunners dragging on white anti-flash hoods and gauntlets as they manned the turrets forward and aft.

‘No. 1, get the Union Jacks unfurled, starboard first.’ The crew quickly unfurled huge British flags on both sides of the ship, clearly marking the vessel as neutral. ‘Full ahead both’, ordered Skinner down the voice pipe to the wheelhouse beneath the bridge, the coxswain repeating his order. The Amethyst picked up speed, but still the shells kept coming. ‘Yeoman, break out battle ensign,’ ordered Skinner, and atop the radar tower the White Ensign proudly snapped out into the wind. ‘Its coming from the north bank, sir,’ said No. 1, as they all trained their binoculars onto the Communist-held side of the river. ‘I saw the flash that time.’

Skinner did not hesitate. ‘Tell Director, train on bearing Green 70.’ The gunnery officer ordered the turrets to turn onto the north bank, and the guns were loaded. The gunnery officer could not yet see the enemy guns, and could only estimate their position and range whilst he looked for their smoke.

‘Open fire!’ said Skinner. A moment later the Amethyst’s 4-inch guns started pumping shells into the riverbank, as Chinese shells started to get the range and began to batter the British ship mercilessly. ‘Tell Wireless Office – make from Amethyst to all ships: ‘Am under heavy fire’. Seconds later a Chinese shell struck the bridge, killing or wounding everyone. Britain was fighting its last battle in China.

The Western domination of China formally came to an end in 1943 when the governments of the Allied powers agreed to relinquish control over their many concessions and enclaves. With the exception of Hong Kong, a crown colony, all other British concessions were signed over to Chiang Kai-shek’s Nationalists. Any future trading with China would be conducted under Chinese laws, foreigners losing their rights to extraterritoriality. Of course, this was all rather a moot point as the concessions were then all under Japanese occupation. It was only in September 1945, following the Japanese surrender, that British armed forces returned to a very changed China.

Chiang_Kai-shek

Postwar China was in turmoil. The uneasy truce that had largely held between Chiang’s Nationalists and Mao Zedong’s Communists had completely broken down once the common Japanese enemy had been removed from the picture. A civil war based on a conflict between two political ideologies had swiftly broken out, a disaster not just for war ravaged China, but also for Western hopes of re-establishing lucrative trade now that the Japanese were gone. The situation was complicated because the Nationalist capital, then recognised as the legitimate government of China, was located in Nanking, far up the Yangtze River from the coast, and British traders and diplomats were isolated and increasingly vulnerable as Communist forces approached the city. In order to protect British interests in Nanking, the Royal Navy stationed a guard ship there with orders to evacuate British and Commonwealth nationals if the Communists threatened the city. The days of the China gunboat were over, these useful vessels having become casualties during the war or handed over to the Nationalists as bribes to keep them on the Allied side. But the Yangtze is a huge river, easily navigable for large ships for hundreds of miles into the Chinese interior.

HMS Consort

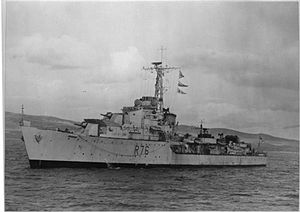
In April 1949 the guard ship at Nanking was HMS Consort, a 1,885-ton C-class destroyer built in 1944. With a full complement of 186, including embarked Royal Marines, the Consort was due to be relieved by another ship coming up from Shanghai, HMS Amethyst. The Amethyst was a smaller vessel than the Consort, officially designated a Modified Black Swan-class sloop of 1,350-tons, though with a larger crew numbering 192 men under skipper Bernard Skinner. A sloop was a large corvette designed primarily as a convoy escort and anti-aircraft vessel. Built in Scotland in 1942, the Amethyst had scored some successes as an anti U-boat patrol vessel during the war. She was armed with six quick-firing Mk. XVI 4-inch anti-aircraft and duel purpose guns housed in three twin turrets, two fore, and one aft. These guns fired 35lb high explosive shells and the vessel was also armed with heavy machine guns.

No one on board the Amethyst expected a fight – her mission was routine, though the crew expected to see some fighting between Nationalist and Communist troops for Mao’s forces had reached the north bank of the Yangtze River and dug in while more troops moved on Nanking. It was only a matter of time before the Communists crossed the river and the Amethyst would be called upon to evacuate British and Commonwealth citizens from the Chinese capital. The British certainly underestimated the degree of ingrained hostility towards them harboured by Communist troops who looked upon the British and other foreigners as having abused, robbed and cheated China for over a hundred years for their own profit and power. The Communists did not want to see ‘imperialist’ ships on the Yangtze.

In Nanking, the Consort was tied up to pontoons secured to the riverbank adjacent to a dried egg powder factory. ‘If, or when civil disorder occurred, all British nationals were told to make for the dried egg powder factory where Jolly Jack would defend them by turning the egg factory into a kind of fort; armed with Lanchesters, Bren guns, rifles and pistols, with Consort on its river flank with its heavier arms,’ recalled Petty Officer Terry Currie, who was serving on the Consort at the time. ‘Every day large junks passed Consort jam-packed with what I took to be refugees. They all looked very poor and dirty in their padded quilted jackets.’

Ordinary British sailors understood little of the situation in China, and perhaps cared even less. ‘Civil war was raging in China at this time,’ recalled Currie, ‘yet I cannot recall being unduly worried – was their war – nothing to do with us. Such was the effect of my cocooned and controlled life [aboard ship] I thought that Mao’s Army was a rabble of peasants armed with pitchforks and staves.’

On 20 April, HMS Amethyst was making her way up the Yangtze when, at 8.31am, a burst of small arms fire from the north bank passed close to the ship. Ten shells in quick succession followed this from a People’s Liberation Army (PLA) artillery battery, the shells all dropping well short of the Amethyst, throwing up great plumes of muddy river water. Skinner was not alarmed – he assumed that the Communists were firing at the Nationalist bank of the river and had misjudged their fall of shot. Skinner ordered speed to be increased and two very large Union Jacks to be unfurled on both sides of the ship to make sure that those ashore knew her nationality and neutral status. The firing stopped immediately.

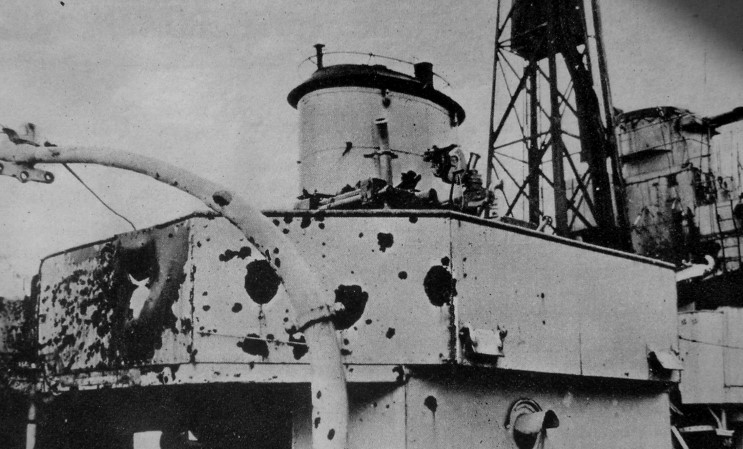
At 9.30am the Amethyst was passing the town of Kiangyin (now Jiangyin), approximately 100 miles east of Nanking by river. The boom of artillery startled the crew as PLA batteries on Low Island opened fire. This time there was no doubt that the gunners’ target was the British ship. The first shell tore over the Amethyst with a whine and exploded in the river. The crew was at action stations. The second shell struck the wheelhouse, causing extensive damage and mortally wounding Commander Skinner and injuring his first lieutenant, Geoffrey Weston. The coxswain was also wounded, but he clung on to the ship’s wheel. During the following few minutes the Amethyst was repeatedly struck by PLA shells. One tore through the sick bay and the port engine room, reducing the ship’s power. The injured coxswain grounded the Amethyst on Rose Island, the vessel coming to rest in a manner that prevented her two forward turrets from engaging the shore battery. PLA shells slammed into the stationary ship, killing and wounding dozens. Lieutenant Weston managed to send a frantic radio message to all nearby vessels: ‘Under heavy fire. Am aground in approx position 31.10′ North 119.50′ East. Large number of casualties.’ A shell struck the radio room, knocking out the ship’s communications, while another smashed the generator, disabling the vessel’s electrics, including power to the gun turrets. The Amethyst was helpless and stuck fast.

xvii

On the quarterdeck the ship’s doctor, Surgeon-Lieutenant John Alderton, ran out to try and tend to the many wounded accompanied by Sick Berth Attendant Owen Aubrey. A Chinese shell instantly killed both men.

Although the two forward turrets could not be brought to bear on the enemy, the aft turret managed to fire thirty rounds before a Chinese shell hit home, disabling one of the two barrels. The other barrel fired off a few more shells until the wounded Lieutenant Weston, who had assumed command from the dying Skinner, ordered it to ceasefire in the hope that this would encourage the Chinese to do likewise. Weston now ordered as many of the crew as possible over the side. As shells continued to hammer the stricken Amethyst everyone who could swam to Rose Island, all the time under a fearsome barrage of artillery shells and machine gun bullets. Several were killed. The walking wounded and non-swimmers managed to get away in the only ship’s boat that was still undamaged.

A total of fifty-nine ratings and four Chinese mess boys made it alive to the Nationalist-controlled south bank. They were taken to a Nationalist Army field hospital for treatment before being trucked back to Shanghai. Forty unwounded sailors remained aboard, along with twelve wounded and fifteen dead. Weston ordered the unwounded to arm themselves with Lee Enfield rifles and Bren light machine guns and to prepare to repel boarders.

One member of the crew who was not evacuated was Simon, the ship’s cat. In March 1948, when the Amethyst had been moored in Hong Kong, Ordinary Seaman George Hickinbottom had befriended the young stray that was hanging around the docks. The seventeen-year-old Hickinbottom had smuggled Simon aboard ship and before long the crew, who appreciated Simon’s ratting expeditions below decks, had adopted the friendly cat. Simon would leave dead rats a presents in sailors’ bunks and had taken to sleeping in skipper Commander Ian Griffiths cap inside his cabin. Simon was considered lucky mascot and when Bernard Skinner took over command in late 1948 he soon took a liking to the affable feline.

xviii

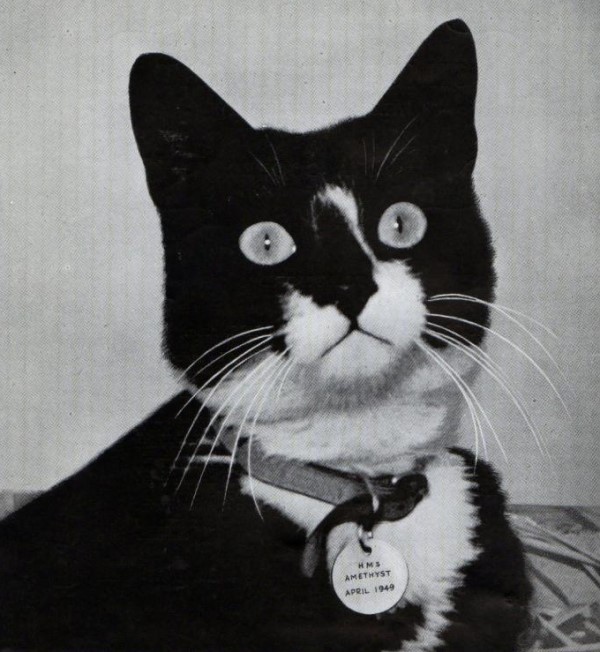
On 21 April 1949 Simon was in Skinner’s cabin when it took a direct hit from a Chinese shell. As the evacuation of the crew was underway a badly wounded Simon crawled out onto the deck where sailors immediately took him to the sick bay for treatment. Four pieces of shrapnel were removed from the cat and it did not look as though the plucky animal would survive.

By 11.00am the Communist shelling had stopped, but any movement on the battered British ship attracted deadly accurate Chinese snipers. A total of twenty-two British sailors had been killed and another thirty-one wounded. On the following day Bernard Skinner, their mortally wounded skipper, also died.

Aboard the Consort, quietly anchored in Nanking, the morning routine was about to be rudely shattered. ‘I noticed Hutch, the Petty Officer Yeoman of Signals approaching the Captain with his signal board in his hand,’ recalled Petty Officer Currie. ‘He saluted the Captain, who returned his salute and then he read his signal. The Captain turned and…hurriedly made for the gangway. We were told that HMS Amethyst had come under fire. She was aground, and had suffered casualties.’

‘In no time all lines were let go and the ship swung around to head down stream at thirty knots, the fastest a British warship had ever travelled on the Yangtze at that time.’ In order to make her neutral status abundantly clear to the Chinese, special precautions had been taken. ‘We had two white sheets, flags of truce – flying from both yardarms,’ recalled Currie. ‘On either side of the bridge large canvas squares were lashed upon which were painted Union Flags. Our white ensign streamed rippling from our stern.’

The Consort intended to take the battered Amethyst in tow and aboard the Amethyst towing cables were hastily prepared. Unfortunately, the entire plan was doomed to failure as the Consort immediately attracted considerable fire from the north bank. Currie and Able Seaman Bater were standing by the unmanned “Y” gun shield, the Consort having a reduced peacetime complement that meant that some guns were missing crews. ‘Suddenly we saw a line of splashes rip across the water just astern of us, followed by an inoffensive pop, pop, pop, popping noise,’ wrote Currie. ‘Bater gasped “I’m scared P.O.” and doing my best not to look scared said, “That makes two of us.’” Bater was called forward and Currie requested a Bren gun and ammunition, which was granted. ‘By now the three 4.5” guns had opened up, also I could hear the twin Bofors thumping away – all hell had broken loose.’

The Consort steamed past the Amethyst, preparing to take her under tow. ‘The river at this point was about one third of a mile wide, ideal for a crossing,’ said Currie. ‘I could see one of their sandbagged gun positions and when they fired, three or four guns together, the blast from the guns lifted the dust in an arc in front of the position.’ Currie lay in the prone position on the deck and loaded his Bren gun. ‘I put my sights on 300 yards and as taught squeezed off a short burst and saw my fall of shot hit the water just in front of the sandbags. I raised the sight to 350 yards and squeezed off another burst (I had no tracers), no hits on the water so I was either hitting the sandbags or at least worrying the Chinese gunner.’

The Consort turned about and made another pass, firing as she went but was unable to stop and take the Amethyst in tow. ‘Our 4.5” shells were exploding on the banks of the river, the shells from the gun batteries were screaming overhead or hitting the water, some exploding and scattering shrapnel across the surface,’ recalled Currie. ‘I could see a gun battery fire and instantaneously the shells either hit or roared overhead.’ The Consort took an almighty battering as she was fired on at virtually point blank range on the river. ‘I decided to go for’rd and as I reached the starboard door at the break of the foc’sle I saw young Able Seaman Bater, he looked shocked and was plastered with, what looked like, mince. I asked if he was ok. He made a shaky gesture with his thumb “I’m ok – it’s from them in there.”’ The horrific nature of the fighting soon revealed itself to Currie. ‘I stepped over the dwarf bulkhead slotted into the bottom of the door and I looked down. An electrician lay dead, his lower jaw shot away, the dirty water from a shattered fire main ran across Consort’s slightly rolling deck and covered his face and body. A stoker lay dead, there was a hole in his side; his liver gleamed wetly on an ammunition box. On the portside lay a messmate, the P.O Telegraphist, disembowelled and one leg off, hit by two 75mm shells – I made my way to the bridge; it was at this time that I think action had been broken off.’

Currie was among many veterans of this battle who later questioned the common sense of placing British warships in such a dangerous situation. ‘While Consort was making a turn, and was virtually a stopped target in the river, the Chinese gunners, in military terms “boxed us.” They put a hole in the barrel of “A” gun and killed an ordinary seaman. “B” gun received a hit removing the gun trainer’s seat and taking most of his backside with it. He died later.’ The Consort narrowly avoided the same fate as the Amethyst. ‘The wheelhouse was hit killing the C.P.O Coxswain and Consort raced for the bank out of control – the Captain steered her by using the twin screws,’ wrote Currie. ‘The gun transmitting station was hit killing the petty officer and a young A.B. The radio office was also hit. Many 37mm solid anti tank shells passed right through the ship wounding many sailors.’

The Consort gave up and signalled the Amethyst that she was heading for Shanghai. The destroyer had taken fifty-six hits from shells, with ten crew killed and thirty wounded.

The Amethyst remained stuck fast. Any movement on the ship’s superstructure attracted Chinese sniper fire, but the Communists had at least stopped shelling the vessel. It seemed clear that the Chinese did not wish to sink the British warship as they could have pounded her to pieces with impunity, but instead the Amethyst was being held hostage. But the Chinese had underestimated both Lieutenant Weston’s resourcefulness and the determination of the Admiralty to rescue the Amethyst. For several days, Weston had tried to free the Amethyst from the sand bank until, on the night of the 22nd, he finally managed it after pumping twenty tons of oil fuel aft had lightened the vessel. Earlier in the afternoon, Weston had received a heartening signal from China Station HQ: ‘HM Ships London and Black Swan are moving up river to escort the Amethyst down stream. Be ready to move.’

HMS London

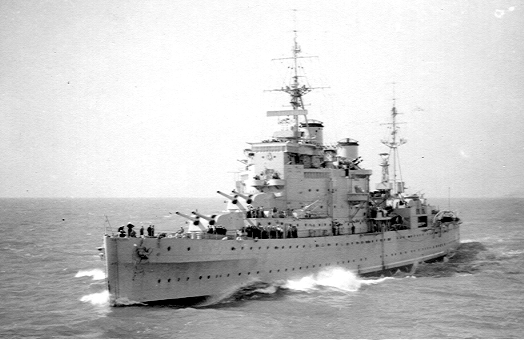
The Consort, instead of heading directly for Shanghai, had instead rendezvoused with HMS London, a 9,750-ton County-class heavy cruiser dating from 1927. During the war she had been part of the task force that had hunted and destroyed the German battleship Bismarck as well undertaking the hazardous task of escorting convoys to Murmansk in northern Russia. Armed with 8-inch guns capable of delivering a 256lb high explosive shell up to fifteen miles away, she was the most formidable vessel on the Yangtze in 1949. The Black Swan was Amethyst’s sister ship, built in 1939. She had been the first British ship into Shanghai in September 1945 in company with the cruiser HMS Belfast, following the Japanese surrender.

When the captain of the Consort heard that the London and Black Swan were going to try and reach the Amethyst, he volunteered his battered vessel. ‘As we were so badly damaged in areas vital to our fighting ability he was ordered to return to Shanghai by the commanding officer of London,’ wrote Petty Officer Currie. ‘This we did and on our arrival, ambulances were waiting on the jetty to take our wounded to hospital. We carried our dead shipmates ashore on stretchers. They had been sewn up in canvas and each body was wrapped in a white ensign. As we carried our dead, a group of American sailors who had collected on the jetty, formed a sort of impromptu mourning party by dividing into two ragged ranks and then saluting as we filed past them to awaiting trucks. This gesture was more respectful than the headline in Time Magazine a few weeks later “Limey’s kicked out of Chinese River.” Who needed enemies when you have friends like?’

HMS London and Black Swan were greeted by a storm of fire. The Chinese were not intimidated by the large British cruiser and liberally plastered her and the Black Swan with both high explosive and anti-tank shells from batteries near Bate Point. The London was holed twelve times on her port side, her two forward 8-inch turrets and “X” after turret were damaged and rendered inoperable, and her bridge was hit several times. The London suffered fifteen killed and thirty wounded while the Black Swan’s superstructure was severely damaged, twelve men being wounded. Reluctantly, the order was given to withdraw down the river lest the London and Black Swan end up in a similar condition to the Amethyst.

HMS London 2

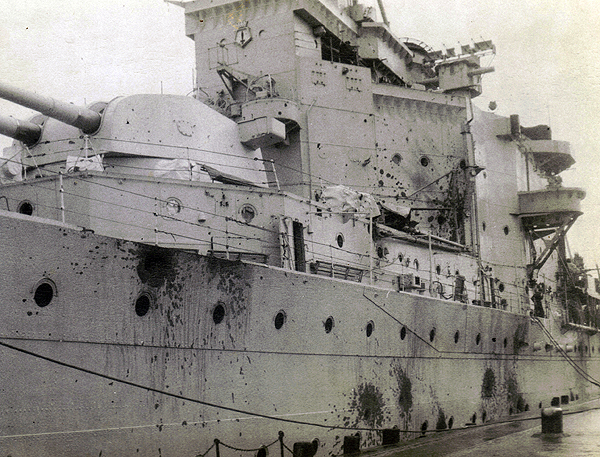
This action revealed the limitations of using large warships as gunboats on a river against an enemy well armed with modern artillery. The London, for all of her size and armament, just ended up as a large target for the Chinese. Because of the narrowness of the river she was unable to stay out of range of the Chinese guns while hitting them with impunity with her big 8-inch main armament. The much smaller prewar Yangtze River gunboats had never had to face such a well armed and determined opponent as the PLA proved to be.

Captain Cazaler of the London, in his Captain’s Report of the action, noted that the vessel had fired 132 8-inch shells, as well as 449 4-inch and over 2,000 light anti-aircraft shells during the brief but very violent river battle. ‘All damage to the ship was quickly and efficiently dealt with by the Damage Control Parties,’ wrote Cazaler, ‘whose performance I consider to be outstanding, taking into consideration the difficulty of providing realistic training in these duties. The bearing and conduct of the Ship’s Company, a large proportion of whom are very young and were experiencing action for the first time, was beyond praise.’ Cazaler singled out the gun crews for particular praise. ‘As an instance, the 4in Gun Crews and Supply Parties suffered 38% casualties, who were not replaced as they fell.’

Later on the 22nd a RAF Sunderland flying boat flew up from Hong Kong carrying Flight Lieutenant Michael Fearnley, an air force doctor, and some urgently needed medical supplies. The huge white aircraft landed in the river near to the Amethyst and quickly off-loaded the doctor and supplies just as the PLA opened fire. Shells landed as close as 100 yards away from the Sunderland and the pilot could not linger. A boat also arrived from Nanking carrying Lieutenant-Commander John Kerans, the British Embassy’s Assistant Naval Attaché, who had been ordered to assume command of the Amethyst.

Sunderland

Some members of the crew later returned to the Amethyst on the 22 April. Vice-Admiral A.C.G. Madden, Commander-in-Chief Far East Station reported to the Admiralty that the vessel had three Royal Navy officers, an RAF doctor, fifty-two ratings and eight Chinese mess attendants embarked. Madden sent a message to the Amethyst: ‘In a splendid performance by all on board ship the work of your sole telegraphist evokes my admiration. I cannot be grateful enough to him for his help.’ Madden was also busy organising assistance for the wounded crew members who were arriving in Shanghai overland. The American hospital ship USS Repose arrived off Woosung and offered her assistance, which Madden gratefully accepted.

In the meantime, the strategic situation in Eastern China had changed dramatically, making the Amethyst’s rescue even more perilous an undertaking. On the same day that HMS London and Black Swan attempted to rescue the Amethyst, the Communists had launched a general offensive along a 250-mile front. One column penetrated as close as forty-five miles from Shanghai. Nationalist forces evacuated the town of Chinkiang and the Shanghai–Nanking Railway was cut. Kiangyin Navy Base, eighty-five miles below Nanking on the Yangtze River, went over to the Communists. Another column threatened the city of Wuxi, seventy miles from Shanghai.

By the 23rd the battered Amethyst was anchored close to Chinkiang. In Shanghai, a memorial service was held at Holy Trinity Cathedral for the twenty-three dead sailors who had been sent by train and the British Resident’s Association started a relief fund to raise money for the dead men’s dependents.

On 26 April, the Communists occupied Nanking. There was no resistance as the Nationalist 28th Army had already evacuated the city along with its positions on the Yangtze River. It had joined up with the 45th Army and the 100,000 soldiers had begun to march towards Hangchow (now Hangzhou) near Shanghai. Widespread civilian looting had broken out in the Chinese capital. ‘While the looters were at work,’ reported a British newspaper, ‘military demolition squads were blowing up Hsiakwan railway station and setting fire to ammunition dumps, aircraft and aviation fuel, lorries, jeeps, stores of weapons, and river craft.’ Order had completely broken down. ‘Policemen stripped off their uniforms and disappeared from the streets.’ Former general Ma Qing Yuan contacted the Communists and arranged for them to enter once his men had brought the looting under control, and he eventually imposed some semblance of order. Over 900,000 Communist troops had crossed the Yangtze in several places, and the Amethyst was now deep inside hostile territory.

The Communist media had begun to report on the Amethyst situation, though for propaganda purposes its reportage was extremely distorted and inaccurate. ‘On Wednesday “two enemy war vessels” suddenly opened fire on Communist positions on the north bank,’ ran one report. ‘The Communists…returned fire and hit one of the vessels [Amethyst], which subsequently sunk, while the other [Consort] steamed to the West and was “half sunk” near Chinkiang. Then another enemy war vessel [London], steaming east from Chinkiang, reached the spot and opened fire.’

In Shanghai, the British Consul-General, R.W. Urquhart, stated to the press: ‘Every possible means of rescuing them [the crew of the Amethyst], either by an operation or a cease-fire order, will be taken.’ But in reality the mighty Royal Navy was running out of options. Vice-Admiral Mallen was loath to expose any more of his vessels to shore bombardment on the river, so some other way would have to be found to obtain the Amethyst’s release. In the meantime, the Repose moved down to the Whangpoo River, anchoring off the Shanghai Bund a safe distance from Communist shore batteries. American Consul-General John Cabot urged the 2,500 US citizens who remained in Shanghai to leave. The US Navy had enough ships to evacuate all of them before the city fell to the Communists, and also space to take off many other foreigners.

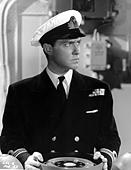
John Kerans was a thirty-three-year-old Second World War veteran and he wasted no time in organising the evacuation of the remaining wounded men and getting the Amethyst sea-worthy again. Soon afterwards, the PLA made contact, requesting a meeting between Kerans and the local PLA political officer, a Colonel Kung. Kung acted as a representative for Colonel Ye Fei, the local military commander. At their first meeting on 30 April, Kung demanded that Kerans sign a statement in which the British admitted to having ‘invaded’ Chinese territorial waters by steaming warships up the Yangtze, and having fired first on the PLA. Kerans refused, stating repeatedly that the Amethyst was going about her lawful business under the various treaties that had been signed between China and the Western Powers when she had been fired on by the PLA without warning or provocation. Naturally Kung refused to accept this. The Communists consistently refused to recognize any of the treaties that had been made under the Qing Dynasty or those by the subsequent Nationalist government, declaring them all to be ‘unequal’ and therefore unlawful. Only in 1989 did retired General Ye Fei finally admit that the PLA had fired first.

Yangtze Incident 5

Kung and Kerans found themselves at an impasse. The Chinese informed Kerans that as long as the British behaved themselves the PLA batteries would not fire on the Amethyst, but if he tried to move the ship they would do so. Kerans and the Amethyst were now to be Chinese hostages, the PLA intention being to starve the crew into submission and force them to sign the face-saving admission of guilt. Kerans never wavered and instead settled down to a long siege.

Yangtze Incident 3

The Amethyst remained at anchor and under PLA guns for ten weeks. The Chinese denied the vessel most supplies, but because a small steaming party only manned the ship since the 21st April battle and evacuation, the ship’s stores were sufficient to last. The Chinese played a cat-and-mouse game with Kerans. They made demands, sometimes offered concessions, such as permitting outgoing mail or supplying oil for cooking, but all the time trying to persuade or bully Kerans into signing a statement admitting that the Amethyst had opened fire first. The entire Chinese strategy was designed to lower the British sailors’ morale, but Kerans was wise to their tricks and he determined to make a run for Shanghai and the open sea when the opportunity presented itself.

One morale-booster for the British was the activities of Simon, the ship’s cat. He had miraculously survived his ordeal by shellfire and had resumed his extremely useful duties killing rats aboard the stationary ship. ‘There was a particularly large and ferocious rat on board that the crew nicknamed Mao Tse Tung. Mao and his followers were wreaking havoc on the ship’s dwindling supplies. The crew felt that Simon in his weakened state would be no match in a one-on-one with Mao.’ They underestimated Simon, and in duel to the death, Mao the rat was killed. Although Kerans did not have the same affinity for the animal as the crew, Simon had nonetheless helped to prevent a disease outbreak by killing off the vermin that infested the Amethyst, and his affection towards the crew was much appreciated leading to his promotion to the rank of “Able Seacat”.

During the early hours of 30 July 1949, the Amethyst slipped her chain and quietly moved downriver towards Shanghai, beginning a hazardous 104-mile dash for freedom. By now, the Communists had crossed the river and established gun batteries on both banks. If Kerans’s escape attempt was discovered his ship would have been blown out of the water by the PLA guns. Kerans’s preparations had included greasing the anchor cable to deaden the noise, and changing the ship’s silhouette with black-painted canvas screens erected forward to confuse the Chinese gunners as to her identity. The crew was all dressed in dark colours and all white parts of the ship’s superstructure had been painted out.

Just before Kerans gave the order to slip, a well-lit Chinese passenger ship, the Kiang Ling Liberation, came around a bend in the river heading for Shanghai. She was carrying refugees. Kerans decided to follow the Kiang Ling, using her as a pilot to navigate the treacherous shoals, and the Chinese vessel’s lights would also distract the PLA gunners, leaving the blacked-out Amethyst trailing in the shadows. However, this plan did not last long as the movement was spotted by the PLA and parachute flares shot into the night sky. Kerans immediately ordered ‘full ahead both’ and the Amethyst surged past the Kiang Ling as the Chinese batteries opened fire. Perhaps distracted by the lights on the Kiang Ling, the Chinese gunners failed to hit the Amethyst, though she returned fire with alacrity. The unfortunate Kiang Ling was pounded by Chinese shells, caught fire and eventually sank, and an unknown number of refugees were killed.

Two forts, Woosung and Par Shan, had protected the entrance to the Yangtze River for over a century. They were thirty-eight miles from the East China Sea and Shanghai. These forts, which had a long history of battles with the British, mounted modern 8-inch guns. If the forts opened fire on the Amethyst she would be destroyed.


In order to help the Amethyst reach the open sea, Admiral Brind ordered another C-class destroyer, HMS Concord, to enter the Yangtze and sit off the Woosung Forts with orders to bombard it if necessary. This was a very risky action, for the Concord was only armed with 4.5-inch guns. Now that the cruiser London had been sent for urgent repairs in Hong Kong following her battering up the Yangtze, the Concord would have to do. But the Concord’s skipper, Commander Ian Robertson, was prepared to do his duty, come what way.

Late on the evening of 20 July, Concord proceeded upriver. She was challenged by a Nationalist Chinese gunboat, but unmolested. The Concord anchored at 1.45am on 21 July, but shortly afterwards weighed anchor and proceeded up the Yangtze for twenty miles. At 2.20am the Concord spoke briefly with another Nationalist warship near the Tungshan bank buoy, anchored again, and after another brief period, set off once more. The telegraphist picked up a message from the Amethyst: ‘Woosung in sight.’ This was followed a little while later by ‘Concord in sight.’ The time was 5.25am, and the Concord spotted the battered Amethyst at a distance of three miles. Concord signalled the Amethyst: ‘Fancy meeting you again’, to which the Amethyst replied: ‘Never, repeat never, has a ship been more welcome.’

Commander Kerans signalled Admiral Brind, with a copy to the Admiralty in London: ‘Have rejoined the fleet, no damage or casualties. God save the King.’ Travelling in concert, at 7.15am the ships “secured from action stations”, which meant they were no longer ready to fight, and at 12.12pm the main engines rang off. They were kept at two hours notice for steam. Concord transferred stores and discharged 147 tons of fuel oil to the Amethyst – after so long under siege, the Amethyst’s tanks only contained seven tons of fuel. At 6pm Lieutenant T.J.D. Grant was drafted onto the Amethyst on temporary loan along with one signalman and one telegraphist.

At 10pm that night the Concord slipped from Amethyst and in company they set off for Hong Kong. A short while later they encountered the destroyer HMS Cossack. Concord was ordered to proceed on patrol leaving the Cossack to escort the Amethyst to Hong Kong. Due to the very sensitive nature of her mission, the Concord’s log book was taken out of service and replaced. The British were keen that there would be no trace of Concord’s ‘invasion’ of the Yantgze River, but this move has led to the part played by Concord’s crew being minimized or ignored, even though they placed themselves under the guns at Woosung, and were expecting a fight. This would also lead to the denial to the crew of the Naval General Service Service Medal with bar ‘Yangtse 1949’ that was given to the ship’s companies aboard the Amethyst, London, Black Swan, and Consort.

Of the forty-six British sailors who were killed during in the Yangtze Incident, twenty-three were buried with full military honours in Shanghai. Unfortunately, during the 1960s their graves were desecrated and eventually completely destroyed. Lieutenant-Commander Bernard Skinner was buried at sea off Shanghai as per the wishes of his widow in Hong Kong, while the remaining dead were buried in the Yangtze River.

It was perhaps only natural that an animal loving people like the British should seize upon the story of Simon, the ship’s cat, to help them come to terms with the Amethyst disaster. Simon was lauded in both the national and international press after the Amethyst returned to Plymouth in November 1949. At each and every port that the ship visited Able Seacat Simon was lauded and honoured alongside the Amethyst’s brave crewman. He was given the premier award for animal bravery, the Dickin Medal, as well as a medal from the Blue Cross. He was also given the Naval General Service Medal alongside his shipmates. One crewman from the Amethyst was given the full-time job of responding to the thousands of letters that people from all over the world wrote to the cat. On arrival in England, Simon was placed into routine quarantine at an animal centre in Surrey but he developed an infection caused by his war wounds and died on 28 November. His tiny coffin, draped in the Union Jack, was interred in a cemetery in Ilford, East London. Hundreds, including the entire crew of HMS Amethyst, attended his funeral.


The Hero of Sandakan – 70 Years On

The Hero of Sandakan

An angry roar erupted from the massed Australian POWs as their commanding officer, Lieutenant-Colonel Alf Walsh, his hands bound tightly behind his back, was frog marched by Japanese soldiers over to a wooden post and tied to it. Guards levelled their long bayonet-tipped rifles nervously at the hundreds of prisoners who had taken a few rebellious steps forward towards their commander. Captain Susumi Hoshijima, the camp commandant, smacked Walsh hard across his face with the back of his hand, and a hastily assembled firing squad noisily cocked their rifles.

Just minutes before, the assembled prisoners had witnessed the strutting commandant mount a small platform and order an interpreter to shout out the following order that all prisoners were expected to adhere to: ‘1. We abide by the rules and regulations of the Imperial Japanese Army. 2. We agree not to attempt to escape. 3. Should any of our soldiers escape, we request that you shoot them to death.’ Following this, Walsh mounted the platform and addressed his men. ‘The Japanese are demanding that I, on behalf of you all, sign this statement.’ Pausing dramatically under the boiling tropical sun, Walsh squared his shoulders and announced in a loud and determined voice: ‘I am not ordering anyone to do anything, but I, for one, will not sign such a document.’ The prisoners’ chorus of approval was abruptly terminated by Hoshijima’s violent attack on their commander. This extraordinary scene had been caused by the escape of twelve Australian prisoners from the camp shortly after their arrival at a place that is today synonymous with cruelty and death – Sandakan.

12

Between May and August 1945 the Japanese forced nearly 3,000 emaciated and diseased British and Australian prisoners of war out of three POW camps that had been established years before outside the small town of Sandakan in the northeast of Borneo. Their Japanese guards systematically and deliberately butchered the Allied prisoners during three large death marches into the island’s rugged jungle interior. The Japanese shot anyone who was unable to keep up with the marching columns. This ugly endnote to the imprisonment of Allied POWs on Borneo has largely overshadowed the story of the Sandakan camps before the massacres. They have also overshadowed a story of enormous courage that was displayed by a small group of Australian prisoners who were led by one of the most determined and unbreakable prisoners, a man who paid the ultimate price for his heroic resistance to the enemy under the most trying of conditions.

The Japanese turned the huge island of Borneo into a giant prison for Allied POWs and civilians. There were camps at Batu Lintang, Kuching, Sarawak, Jesselton, and Sandakan and briefly on Labuan Island.

In command at Sandakan was Captain Susumi Hoshijima, an officer with a penchant for brutality, sadism and irrationality in equally disturbing measure. Captain Hoshijima’s greatest nemesis was about to arrive at Sandakan. Lionel Matthews was a 29-year-old decorated captain in the Australian Army Signal Corps from Norwood, Adelaide. Matthews would prove to be a considerable thorn in the side of the Japanese, and a man for whom the words ‘never surrender’ could have been his motto. Matthews had first arrived in Singapore on Valentines Day 1941 as part of the Major General H. Gordon Bennett’s much vaunted 8th Australian Division. The brown-haired, blue-eyed former department store salesman who sported a neatly trimmed moustache quickly impressed his superiors during the Battle of Gemas, one of the bloody engagements fought by the Australians during the retreat down the Malay Peninsula. Then Lieutenant Matthews went out under heavy Japanese artillery and mortar fire to restore communications between his brigade headquarters and its subordinate units. He also ‘succeeded in laying cable over ground strongly patrolled by the enemy and thus restoring communication between his Divisional HQ and the HQ of a Brigade at a critical period.’ Awarded the Military Cross, Matthews was promoted to captain in January 1942. Captured when General Percival surrendered Singapore in February 1942, Matthews was initially imprisoned at the infamous Changi Camp. Back in Australia his wife Lorna and young sons heard little of his activities, or of his ultimate fate, until 1945.

16

At Sandakan, Matthews did not view his circumstances as a reason to stop fighting the Japanese. Within a harsh and terrifying environment Matthews began to create an organisation that would eventually pose a serious threat. Hoshijima strictly forbade any communication between the three camps, and anyone who disobeyed this order was severely punished. Matthews first task was to break Hoshijima’s prohibition on inter-camp communication by setting up a secret network. He also began to address the central problems that were faced by the POWs, namely a lack of medicines to treat the various tropical diseases that stalked them more efficiently than their guards, as well as a shortage of food. Matthews’ efforts in smuggling food into the camps through his contacts with locals went some way to alleviating chronic malnutrition. Matthews could only do this by building contacts with the world beyond the perimeter fence, a decidedly dangerous undertaking as he never knew for sure who could be trusted and who would have turned them over to the Japanese in return for cash.

The Japanese allowed Matthews to command a small group of prisoners who were permitted outside unsupervised by guards to collect nuts. A grove of palm-oil trees behind the local police station became Matthews’ connection point to the local underground resistance movement. The police put Matthews in touch with local British doctor Jim Taylor, one of several medics and dentists that the Japanese had not interned because their skills were desperately needed. Although under close watch, Taylor risked his life smuggling medicines to the camps, along with another civilian, Lillian Funk. This intrepid lady had wisely converted some of her assets to gold, pearl, foreign currency and gemstones just before the Japanese had captured Sandakan, and she had sewn these valuables into the hems of her clothes. She sold what she needed to purchase food and medicines for the POWs, and also maintained a link with Philippine guerrillas.

Matthews organized a group of twenty trusted officers and NCOs into an ad hoc intelligence-gathering group. Using sympathetic local intermediaries, Matthews’ group made contact with British civilians being held in an internment camp on nearby Bahara Island. Natives often entered the camps to perform various menial chores, and British and Australian working parties outside the camps also had contact with locals. At the civilian camp on Bahara Island was Charles Smith, the former Governor of North British Borneo. Smith immediately realised the value of Matthews’ intelligence work and appointed him secret commander of the North British Armed Constabulary, a native police force that remained in operation under Japanese control. Many of its officers and men remained loyal to the British. Many locals were of Chinese descent, and their treatment by the Japanese was harsh and discriminatory, engendering great hatred. Many were happy to help the British war effort if it meant an end to the Japanese occupation. Matthews built up a dossier of intelligence concerning the organization and deployment of Japanese forces in North Borneo, their strengths and bases, supply situation and details about the local geography. Matthews intended to pass all of this valuable information on to the Allies in the hope that it would assist them in eventually liberating Borneo.

The gathering and caching of firearms was another of Matthews’ efforts, the intention eventually being to launch an insurrection most probably timed to coincide with an Allied invasion. Matthews’ group needed information about the progress of the war, so using their network they managed to smuggle radio parts into their camp and constructed a simple wireless receiver. It was a mission fraught with danger, but two Australian officers, Lieutenant Rod Wells and Lieutenant Gordon Weynton, put together the crystal detector, valves and headphones.

The job of getting a signal on the basic wireless took weeks of effort, but one day through the crackling static came a familiar English public school voice that confidently announced: ‘This is the BBC’. Barely able to contain his excitement, Matthews ordered the delicate set wrapped in a waterproof groundsheet and carefully hidden inside an unused latrine pit. A system of nocturnal radio monitoring was set up, whereby news was carefully written down by the listeners and then distributed to the POW officers, who in turn passed it on verbally to their men, raising morale.

Matthews knew that it was important to demonstrate to the locals that the war was turning against the Japanese, to secure their continued support for his secret activities. Russ Ewin was tasked with passing the latest bulletins to the resistance. ‘The police station was the contact for me. I would report each day to Lionel. If he had anything to be taken out of the camp, I would take it,’ recalled Ewin. The risk of being caught on one of these missions did not bear thinking about. Ewin would most probably have been horribly tortured by the Kempeitai and then shot. ‘It usually was the news,’ said Ewin of the packages that Lionel gave him, ‘and it was rolled up tightly in a wad of paper sealed with sealing wax. When we came to the police station, I would just nod my head slightly, and the police sergeant, Sergeant Abin, who I had met, would just watch my hand and I would open it and drop the news. He would pick it up afterwards…’

This operation went smoothly, but what he heard on the radio emboldened Matthews to pursue another plan that unfortunately proved to be his undoing. Any uprising that was going to be made by the remaining fit prisoners, the members of the Constabulary and other sympathizers needed to be carefully timed. Matthews knew the prisoners needed a radio transmitter so they could communicate directly with the Allies as their current wireless was only a receiver. The process of smuggling the parts into the camp began, but the fundamental weakness of Matthews’s organisation was the large number of people involved outside of the wire. Unfortunately, one of the Chinese sympathizers who procured radio parts, Joe Ming, was betrayed to the Kempeitai by a disgruntled contact. The Kempeitai moved with their customary swiftness to destroy the ‘resistance organisation’ and brutally tortured Ming and his family until they broke and started talking.

For Matthews and some of his men the game was up. He had long known the terrible risks that he was running, but his sense of duty had outweighed any concerns that he may have had for his own personal safety or survival. ‘He was in a position where he could have escaped on numerous occasions by means of help of an organisation set up by the Chinese but he declined, electing to remain where his efforts could alleviate the sufferings of his fellow prisoners.’ The Allied conspirators that had been named by Joe Ming, including some local men, were removed to Kempeitai headquarters in Kuching. For three long and terrible months Matthews and his friends were horribly tortured. They endured vicious beatings, including the infamous ‘water treatment’. They were hung by the arms for long periods and had their fingernails pulled off with pliars. One of their number, Johnny Funk, whose wife Lillian had sold gold and pearls to buy medicine for the prisoners, recalled: ‘They had four bungalows which were used for torture rooms. One form of torture was to make you kneel on a plank specially carved like spikes. They then placed a heavy plank behind the knees and two Japanese got on each and worked it like a see-saw.’ The Kempeitai was inventive in the methods it employed. ‘Another torture was carried out by a Jujitsu expert. He flung you all around the room. He badly twisted limbs and used his boots freely,’ said Funk. ‘I was also jammed in a specially constructed chair, in a cramped position. For half a day I was whipped around the head.’

Captain Matthews and the others managed to resist all Japanese efforts to make them talk. All the Japanese had by way of evidence was the ‘crime’ of possession of an illegal wireless set and some vague notion that these men had been plotting against the occupation forces. The Kempeitai arrested and tortured fifty-two civilians and twenty POWs, accounting for virtually Matthews’ entire network and a good proportion of the local underground as well.

Those arrested ended up in Kuching. Gordon Weynton was found guilty of ‘spreading rumours’ and sentenced to ten years imprisonment. Lieutenant Wells received twelve years hard labour, to be served in solitary confinement. Both officers were transported to Outram Road Jail in Singapore to serve out their sentences, saving them from the Sandakan Death Marches in 1945. As for Matthews, his fate was sealed the moment he was captured. The court sentenced him to death by firing squad.

On 2 March 1944, alongside eight of the other ringleaders, Matthews faced his execution with great courage. ‘He left Australia nearly 16 stone and he was only 6 stone at the end’ said his son David of the father he never knew. Matthews declined a blindfold and looked his Japanese executioners square in the face. He was posthumously awarded the George Cross for his immense courage and resourcefulness in captivity, the very highest award available to Commonwealth citizens for valour that was not performed in battle.

The Man Who Wouldn’t Surrender

The Man Who Wouldn’t Surrender

by

Mark Felton

Roy Pagani tore along a jungle trail as fast as he could go. The heat was stifling and sweat poured down his face. The vegetation was alive with the chirruping and squawking of insects and birds. Mosquitos buzzed around his head as he panted and hurried on. The Japanese would not be far behind and capture was not an option. The young British soldier was determined to walk a thousand miles to India.

Pagani was born in London in 1915 and joined the army in 1933. He had served in India before going to France with the BEF in 1939. Because he spoke fluent French he found work as an interpreter. After evacuation from Dunkirk, Pagani joined the elite Reconnaissance Corps. Ordered to Singapore, Pagani’s unit saw action in the last desperate battles around the city before being ordered to surrender on 15 February 1942 with the rest of General Percival’s army.

Reconnaissance-Corps

Corporal Pagani approached his commanding officer, Major D.R. Lullineux, on the 15 February and told him that he wanted permission to escape. Lullineux readily gave his permission and also wished him good luck, for the odds of getting away were extremely slim. Pagani went to the burning docks where he found several motor launches. He desperately tried to start the engines on several, but to no avail. Night began to fall. Then he spotted a 15-foot sampan and jumped aboard. The native craft had a rudder and small sail, but no engine. As Singapore burned, the sampan slowly moved across the calm water. Pagani slumped over the tiller and peered into the darkness, struggling to stay awake. He realised that if he was to stay on course he would have to go ashore and get some rest. He landed and promptly fell into a nervous sleep.

Pagani awoke refreshed the next evening and continued south. Travelling by night to avoid detection he worked his way through a chain of small islands. Before dawn on 17 February Pagani landed again. In the evening Pagani sailed south to another jungle-covered island and made contact with a local Chinese merchant, who kindly provided him with rations. Before dawn on 19 February Pagani beached his sampan on Moro Island where he discovered a small party of British soldiers. They had been sent to assist fugitives escaping from Singapore to get to Sumatra in the Netherlands East Indies. ‘The British soldiers advised Pagani to go to Sumatra because the chances of surviving an open ocean voyage to Australia in such a small boat were slim.’

‘During the second night he was caught in a terrible storm. He lowered the sail and secured the boat. But as the storm intensified waves repeatedly broke against the side of the boat.’ For hours Pagani was tossed about like a cork on the roiling ocean as the wind howled and salt spray lashed his face. Then the storm abated. Peering into the growing light Pagani espied low-lying land a mile away. He hoisted sail and tacked the sampan into the mouth of a wide river. ‘After creeping up the river for several hours he finally saw a small group of men. They waved that he should come ashore. They were British soldiers…He had made it to Sumatra…’

Pagani, along with thousands of others, crossed Sumatra to the east coast port of Padang where evacuation ships were arriving to take them to India. For nearly two weeks Pagani waited to board a transport as the Japanese headed for the port. On 15 March, with Japanese infantry close by, Pagani joined a motley assortment of beached British sailors. They located a small steam tug and two days later, with the tug full of provisions, they departed. But disaster struck. The Japanese had taken the town moments before and soldiers fired a machine gun across the tug’s bows, ordering it to return.

Five hundred British servicemen, along with 700 Australians and Dutch, were taken prisoner and herded into a local barracks. After a few days, the Japanese organised the POWs into groups and shipped them to Mengui, Burma. They were to become slave labourers on the infamous Burma-Thailand Railway.

The railway cost the lives of 90,000 Asian labourers and 16,000 Allied POWs (including 3,585 Britons). Pagani was held in a camp for several months until on 21 October 1942 the Japanese transported the POWs to Moulmein Station and the following day a train took them thirty miles to Thanbyuzayat, the main junction for the Burma-Thailand Railway. Pagani and the others were expected to construct the junction at Konkuita in Kanchanaburi Province, Thailand and would be based at the infamous 18KM Camp for the duration, under the brutal command of Lieutenant-Colonel Nagatomo.

Pagani realised that every day he spent as a slave labourer on the railway would make escape less likely. He quickly formulated two escape plans. The first involved heading ten miles west to the Bay of Bengal. At the coast Pagani would steal a boat and then sail along the Burmese coast to India. If he was unable to find a boat, Pagani’s second plan involved walking 1,000 miles overland through Burma to India. His epic trek would take him through some of the toughest country on earth where tropical diseases abounded, and he could not speak the local languages. ‘Pagani had prepared himself. He was now as brown as a native and his feet were hard for the trip (to pass as a native he would have to travel without shoes). He had a full brownish-red beard. He looked like a Burmese native, and the Japanese would be looking for an Englishman.’

Pagani decided to escape two days later. When dawn broke on escape day, Pagani was already up and he quickly breakfasted on a small bowl of rice gruel before attending the tenko roll call. The Japanese routinely beat any prisoners who reported for sick parade. After a short bashing the offending prisoner was handed a changkul, a native hoe, and ordered out unescorted to join a work party beyond the main gate. Pagani duly reported sick, was beaten, handed a changkul and ordered out. When he was about 100 yards beyond the main gate, with his changkul over his shoulder, he stepped off the track and into the jungle. He would not be missed until evening tenko, and the Japanese would not start looking for him until the following morning.

Pagani reached the coast in four hours but failed to find a boat. As he was only ten miles from the camp Pagani fell back onto Plan B – walking to India. He set off in a northeasterly direction until he reached the railway and followed this north towards Moulmein. He reached Thanbyuzayat, a small village near Moulmein later that afternoon. Quickly donning an Indian pagri turban, he rubbed dirt into his legs and face in an effort to further disguise his European features. He then set off down the village’s main street. Suddenly, a Japanese patrol appeared. ‘He overcame the natural instinct to run and instead casually walked toward a house to urinate. Since his survival depended on passing as a native Pagani followed the local custom.’ The Japanese soldiers strolled by, barely casting him a glance. Shortly after Pagani ducked into an empty shop stall and fell asleep.

He awoke after sundown and set off for the railway line towards Moulmein. As the first light of dawn began to spread across the horizon Pagani came to a small shack set on the edge of paddy fields where he rested until darkness fell. Pagani walked all through the next night until he happened upon another wooden hut at dawn. The Indian inside offered to help him but warned Pagani against entering Moulmein, which was swarming with Japanese. Instead, it was agreed that the Indian’s brother would ferry Pagani across the Salween River.

After crossing the river Pagani trekked for two days until the wild jungle gave way to an ordered plantation look. He crept through the trees until he discovered several well-kept buildings. ‘The place had an unmistakable feel of prosperity. He surmised that the people had prospered under the British and most likely did not look upon the Japanese with good favour.’ Knocking on the front door, a servant instructed Pagani to wait. Then a well-dressed young woman speaking perfect English invited the filthy fugitive into her elegant home. Her father, Po Thin, was a wealthy Karen timber merchant. When Pagani was introduced to Po Thin he recounted his many escape attempts since Singapore and his imprisonment on the railway. Po Thin was impressed, and agreed to help him reach Allied lines. He knew of an eccentric British major who was busy training Karens up in the hills to fight the Japanese.

Pagani eventually reached the small village of Molopa high in the Karen Hills. The village contained an extraordinary mixture of soldiers and civilians. Alongside the Karens were Indians and Gurkhas. A tall native walked towards him smiling and announced cheerfully: ‘Hello old chap, how are you?’ in clipped public school English. ‘The man introduced himself as Major Hugh Seagrim. He grasped Pagani’s hand and in a voice choked with emotion kept telling him how glad that he was that he had come.’ Thirty-three-year-old Seagrim had joined Force 136, the Far Eastern arm of SOE, and been tasked with training the loyal Karens to fight the Japanese. At 6 feet 4 inches tall Major Seagrim had earned the affectionate nickname “Grandfather Longlegs” from the Karens. His sabotage activities had already earned him a DSO and a MBE.

10

Pagani and Seagrim both realised that the Japanese would be searching for their missing prisoner. Seagrim decided that henceforth Pagani would be known as “Corporal Ras”, so if recaptured the Japanese would not link him with their missing Corporal Pagani. Seagrim delighted in tutoring Pagani on the hill tribes of Burma, and he respected the corporal for his bravery and resolution in escaping from the Japanese. Pagani said that Major Seagrim was the finest officer that he had the pleasure to encounter during the war. Seagrim made Pagani his commander for his southern area of operations – the young corporal became a guerrilla leader by chance. After many raids Pagani was sent by Seagrim on a mission to contact Allied forces in the Prome region on 9 April 1943. The next time the two men would encounter each other would be under very different circumstances.

After leaving Seagrim, Pagani travelled north with some of Seagrim’s heavily-armed guerrillas. His intended destination was a group of friendly Karen villages in the Arakan Yomas coastal region. He would have to cross Burmese territory, including the mighty Irrawaddy River. He discharged his Karen guards except one guide. The next day hostile Burmese captured his guide. Alone once again, Pagani continued on towards the Irrawaddy. Two days later, while resting in a Burmese pagoda, he dashed outside to see a formation of American B-25 bombers on their way to attack the city of Prome, 150 miles north of Rangoon. Pagani felt it a good idea to disassociate himself from the British Army, as the Japanese might still manage to make the link between “Corporal Ras” and their missing Corporal Pagani. Thinking of his baby son, Terry Ashton Melvin Pagani, he decided to re-invent himself as a shot down American air force officer named “Lieutenant Terry Ashton Melvin”.

The next day Pagani arrived on the east bank of the Irrawaddy. He spent a few hours searching for a boat but realised that his only hope was to swim across. The current was strong and unpredictable. Pagani stepped into the warm waters and began to strike out for the western bank in the moonlight. ‘About 150 yards from the bank he was caught in a strong undertow that, coupled with the weight of his gun and ammunition, threatened to pull him under. He dumped his gun and spare ammunition and floated downstream, but the current pushed him back onto the east bank of the river.’

Exhausted, Pagani was spotted by two Burmese in a fishing boat, who picked him up. But a crowd of Burmese ordered the fishermen to hand Pagani over. They wanted to present him to the Japanese in return for a small reward. Amid much commotion Pagani was bound with rope. He managed to break free and dashed for the nearest jungle, but he was shot and wounded. ‘Beaten and bloody, Ras thought of his wife and young son and his promise that he would return home. They would never know what happened to him.’

Pagani was transported downriver to a Japanese guard post and handed over. His wound was perfunctorily treated before he was questioned. He told the Japanese that he was a USAAF officer who had been shot down the night before during a raid on Prome. Transferred to a hospital, he slowly recovered his strength. The Japanese interrogated him in more detail. ‘He explained his native clothing by saying that his uniform had caught fire, and the natives had given him what he was wearing.’ After six weeks Pagani was sent to Rangoon. On arrival Pagani was handed over to the brutal Kempeitai military police.

Placed in a tiny cell with five other prisoners, Pagani witnessed prisoners being brutally interrogated. Pagani was dragged into a room containing two Japanese NCOs, each armed with a bamboo cane. One asked the questions, while the other beat Pagani mercilessly. Pagani stuck to his cover story. Next, he was dragged into a second room where two more interrogators were waiting. One of the interrogators was a junior officer, and in between questions he would beat Pagani with the back of an unsheathed samurai sword. Sometimes he levelled a cocked pistol at Pagani’s head and dry fired it. Finally, Pagani was bundled into a third room where he was tied to a flat surface with his head positioned beneath a dripping tap. After a while each drop of water that hit his forehead felt like a hammer. At some point the questions and the agony abruptly ceased and Pagani was dragged back to his grimy cell to nurse his wounds.

Pagani’s endurance paid off, and he was cleaned up and sent to Rangoon Jail. The prison held nearly 600 Allied prisoners of war in appalling conditions. One of the prisoners was Major Seagrim. His unit of Karen guerrillas was steadily worn down in combat, and the Japanese had made horrific retaliatory attacks against Karen villages. Seagrim could not abide the cruelties that were inflicted upon his beloved Karens and on 15 March 1944 he voluntarily surrendered himself to the Japanese after he had received assurances that he would be accorded POW status. The Kempeitai did not torture Seagrim as it seems that even the Japanese had some respect for him. On 2 September 1944 Pagani looked up from his work party as a Japanese Army truck drove past. In the back of the truck he saw a tall Englishman and seven Karens. ‘As they started through the breezeway towards the front gate the Englishman saw Pagani, gave him a big smile and waved to him. It was a few moments before Pagani realised that the Englishman was his beloved Major Seagrim.’ The Japanese broke their promise. Seagrim and comrades were court-martialled, sentenced to death and executed by firing squad later that day. Seagrim was posthumously awarded the George Cross in 1946.

Pagani spent the remainder of the war labouring on the Rangoon Docks. The death rate in the camp was later determined to have been between 20 and 25% of the white prisoners. Roy Pagani was liberated on 28 April 1945 and later awarded the Military Medal. He finally made it home to his wife and young son.

For more thrilling stories like this, read:

Japanese Jungle Holdouts

Japanese Jungle Holdouts

Mark Felton

Onoda 3

A small, thin, middle-aged officer, his uniform patched and darned, his field service cap emblazoned with the yellow star of the Imperial Japanese Army, stepped forward in a jungle clearing and bowed stiffly before lifting up his samurai sword and offering it to the assembled officials in surrender. The place was the island of Lubang in the Philippines and the date was 9 March 1974. Fifty-one-year-old Second Lieutenant Hiroo Onoda had finally given up resistance. The last thing his commanding officer had said to him was ‘Whatever happens, we’ll come back for you.’ Twenty-nine years later the Japanese returned. Onoda was one of the last recorded Japanese ‘holdouts’, living relics of a war that had ended nearly three decades before. While the world had moved into the Cold War, Onoda and others like him had remained hidden in the jungle, convinced World War II was still being fought. Onoda 2 When Japan surrendered in August 1945, the Imperial Army and Navy still controlled a vast swathe of Asia including eastern China, Malaya, Singapore, Netherlands East Indies and dozens of far-flung tropical island groups garrisoned by three million troops. Most knew nothing of Hiroshima and Nagasaki. They were well-armed and mentally conditioned to fight on to eventual victory or an honourable death. Surrender was anathema to them. Orders were transmitted to units telling them to stay in their barracks and await the arrival of Allied forces who would take their formal surrenders. But tens of thousands of Japanese troops never received the order as their communications with Japan had broken down or their units had been smashed and scattered during the fierce battles across the Pacific. Others, including complete units, refused to believe that such a shameful order could have emanated from their divine Emperor Hirohito – these diehards believed it was an Allied trick. They determined to stay in the jungle and wait for their army to recapture the lost territories. Between 1945 and 1961 many of these ‘holdouts’ were caught or convinced to surrender by Japanese officials. What is not widely known is that some Japanese units and stragglers even launched attacks on American occupation forces or the armies of the newly independent postwar nations necessitating dangerous operations to capture or kill them. One of the most notorious was Captain Sakae Oba on Saipan, who continued to lead his 46 heavily armed men in attacks on US forces until convinced to surrender by a former Japanese general in December 1945. On another occasion in the mountains south of Manila on 25 January 1946 American and Filipino forces mounted a joint operation to eliminate a 120-man Japanese unit. In the vicious fighting that followed 72 Japanese were killed. In Lubang, Philippines, a 30-man Japanese unit was brought to battle on 22 February 1946. Eight Allied soldiers died along with an unknown number of Japanese. The following month a further 41 Japanese soldiers emerged on Lubang and surrendered, eight months after the war had ended. On Peleliu a 33-man Japanese force attacked American patrols throughout March and early April 1947 until persuaded to surrender by a former Japanese admiral. Onoda And so it continued all over Asia in the immediate aftermath of the war. In the Philippines in April 1947 a seven-man Japanese heavy mortar team emerged from the jungle on Palawan Island and surrendered, and in the same month on Luzon fifteen Japanese troops finally gave up. Four-and-a-half years after the Americans had captured Guadalcanal in the British Solomon Islands, the last Japanese soldier finally emerged from the interior and surrendered on 27 October 1947. The last sizeable Japanese unit to surrender was on Mindanao in the Philippines. Two hundred troops were persuaded to give up in January 1948, surrendering well-maintained rifles and machine guns. Holdout In New Guinea, site of the valiant Australian defence of the Kokoda Track in 1942 and the battles around Port Moresby, local police apprehended eight Japanese soldiers in 1950. They were survivors of a division that had been destroyed during the Battle of Finschhafen in September and October 1943 and the retreat of the starving Japanese towards Madang. They had hidden in the dense jungle for seven years. Then, four years later in 1954 New Guinea police captured another four Japanese holdouts, the last survivors of a group of 89 Japanese who had forced marched from Wewak to Hollandia in April 1944. Their companions had all died of disease or starvation in the jungle. During the 1950s, as Japan rebuilt its economy and emerged as a deeply pacifist country, these jungle holdouts were not viewed as fanatics but as victims of the war. The soldiers captured in New Guinea were portrayed in Japan as exotic beings, ‘jungle men’. By 1955 this view had altered slightly, notes historian Beatrice Trefault, and the Japanese viewed them as soldiers, ‘but not just plainly, as living heroes but as a moving image of the fallen soldier, in other words, as ‘dead soldiers’ accidentally and unexpectedly alive.’ Later, as more soldiers appeared throughout the 1970s, the Japanese public’s perception of them changed still further and they began to be seen as heroic examples of endurance and courage to the younger postwar generation. The 1960s was relatively quite and only two Japanese holdouts emerged on Guam and surrendered in 1961. They had held out for an amazing sixteen years. But if the Japanese and the rest of the world thought that the phenomenon was over they were astounded when, in 1972, after a staggering twenty-eight years in hiding, a single holdout turned up alive on Guam. Corporal Shoichi Yokoi’s discovery hit the headlines around the world. Yokoi, of the 38th Infantry Regiment, had fled into the jungle in July 1944 along with many other stragglers following the American victory. As we have seen many of these troops surrendered in the 1940s, ‘50s and early ‘60s, or they had died of injuries, illness or starvation. Yokoi and two comrades had constructed an underground hiding place and subsisted for years on a diet of seafood and coconuts. Sometime during the 1960s the two other soldiers who were with Yokoi moved away and later died of starvation. Yokoi stayed hidden, putting his pre-war tailoring skills to use by making himself a new uniform out of tree bark. Two local hunters fishing on the Talofofo River in January 1972 discovered him. Yokoi, like many other holdouts, had seen leaflets announcing the Japanese surrender dropped by American aircraft in the 1940s, but he believed them to be a trick and decided to stay in hiding. His unaltered wartime psyche was demonstrated when he was returned with considerable media coverage to Japan. He stated: ‘It is with much embarrassment that I return.’ Yokoi said that he wished to return his rusty and useless Arisaka rifle to ‘the Honourable Emperor. I am sorry I did not serve His Majesty to my satisfaction.’ Yokoi’s rehabilitation was swift and impressive considering that he had spent almost three decades subsisting in the jungle. He married, became a TV presenter and even ran for parliament in 1974. In 1991 he was granted an audience with Emperor Akihito during which he said that he regretted having failed to serve the Imperial Army well and was overcome with emotion. Yokoi died in 1997. The Japanese government became so concerned that other middle-aged men like Corporal Yokoi might still be in hiding in Southeast Asia that they created a special unit to look for them from officials at the Ministry of Health, Labour and Welfare. The most famous holdout of all emerged from the jungles of Lubang and surrendered in March 1974. Second Lieutenant Hiroo Onoda was very different from Yokoi because he had continued a violent guerrilla campaign that caused several deaths and substantial military and police operations for thirty years. ‘Every Japanese soldier was prepared for death, but as an intelligence officer I was ordered to conduct guerrilla warfare and not to die,’ said Onoda in 2011. ‘I had to follow my orders as I was a soldier’. He took a small team of Japanese soldiers into the island’s interior and waged an aggressive campaign that last almost 30 years. Along with Corporal Shoichi Shimada, Private First Class Yuichi Akatsu and Private Kinshichi Kozuka, Onoda constantly moved his command every five days to avoid capture, the men living off bananas, water buffalo, wild boar, chickens and iguanas. Occasionally Onoda and his men would emerge from their mountainous jungle hideouts to shoot cows owned by local Philippine peasants. This was always risky because the gunfire attracted local police and on several occasions the Japanese holdouts were fired at. In 1949 Private Akatsu decided to leave the group after an argument. Onoda thought that he would starve to death but Akatsu managed to survive for six months on his own before he surrendered to a Philippine Army patrol. Later Onoda discovered a note from Akatsu that stated that the war was over and the Philippine troops were friendly. Akatsu led soldiers into the mountains in 1950 in an attempt to locate Onoda’s group and persuade them to surrender. They never found them. Onoda considered Akatsu to be a traitor and working for the enemy. In 1952 the Philippine and Japanese governments made a further attempt to locate and capture Onoda’s group. Letters and photographs from the holdouts’ families were dropped over the jungle. ‘The leaflets they dropped were filled with mistakes so I judged it was a plot by the Americans,’ said Onoda. In June 1953 Corporal Shimada was shot and wounded in the leg by local fishermen when the group was on one of its regular village raids. Onoda and Private Kozuka nursed Shimada back to health but the corporal was killed during a firefight with searchers on 7 May 1954. Onoda and Kozuka continued to raid local settlements for supplies, often burning the harvested rice and shooting at local peasants. It has been estimated that Onoda’s depredations killed or wounded around thirty Filipinos over the decades. On 19 October 1972 the two holdouts were busy burning rice stocks in a village when armed police arrived. During the following gunfight Kozuka was hit twice and killed. Onoda fled into the jungle vowing to kill anyone who came after him. A Japanese student and adventurer, Norio Suzuki, set out to find Onoda in 1974. It seemed unlikely that he would succeed where governments and armies had failed, but camping alone within Onoda’s ‘territory’ he managed to strike up a hesitant friendship with the Japanese officer. Suzuki persuaded Onoda to come to a parley in a jungle clearing to meet with Japanese and Filipino representatives. At the meeting Onoda stated that he could not surrender until he had received a direct order from his superior, and he went back into hiding. Finally, on 9 March 1974, Lieutenant Onoda met with former Major Taniguchi, his old commander on Lubang, who ordered him to hand over his samurai sword and surrender with honour. Hiroo Onoda, still the punctilious officer that he had been in 1945, immediately obeyed. Onoda was very well armed and surrendered his sword as well as a functioning Arisaka Type-99 rifle, 500 rounds of ammunition, several hand grenades and a commando dagger. On his return to Japan Onoda became something of a celebrity. He was different from other recently returned holdouts – he had been an officer and he had not stopped fighting, however misguided his resistance had ultimately been. This living relic from the war may have impressed modern Japan but the modern Japanese did not impress Onoda. ‘Japan’s philosophy and ideas changed dramatically after World War II. That philosophy clashed with mine so I went to live in Brazil.’ Now aged 90, Onoda lives in Japan but spends three months of every year in Brazil and was honoured with a medal by the Brazilian Air Force in 2004. In 1996 Onoda controversially returned to Lubang and donated US$10,000 to a local school, perhaps as recompense for the harm he and his men caused during their three-decade terror campaign. When asked why he held out for so long, Onoda’s single-mindedness was plain: ‘I became an officer and I received an order. If I could not carry it out, I would feel shame.’ Within months of Onoda’s capture reports started to filter in from Morotai in Indonesia where locals had reported Japanese soldiers hiding in the forest for decades. The Japanese government set up loudspeakers around the island’s mountainous interior and blasted the area with the wartime Japanese national anthem. Then, in October 1974 an Indonesian Air Force pilot spotted a small hut hidden in the jungle. Two months later Private Teruo Nakamura of the 4th Takasago Volunteer Unit emerged from hiding armed with a functioning rifle and his last five rounds of ammunition and surrendered to local troops. He had no idea that the war was over and had long believed that he would be killed if captured. He had built a small hut in the forest set on a 20-by-30 metre fenced field. Nakamura, a native conscripted Formosan chose to return directly to Taiwan. His capture did not excite the Japanese media – Onoda was a Japanese officer whereas Nakamura was a conscript from a former Japanese colony. Nakamura died of lung cancer in 1979. Since Onoda’s surrender reports have continued to surface almost up to the present day of Japanese holdouts. In 1980 it was widely reported that a Captain Fumio Nakahira had been discovered on Mindoro after 36 years in hiding. This story proved to be a fake. In 1989 on the Pacific island of Vella Lavella locals reported that old Japanese soldiers had been pilfering food and supplies for decades. These stories were probably hoaxes designed to lure rich Japanese tourists to the island. In 1992 on Kolombangara, an island north of New Georgia that was bypassed by American forces in 1943 during the island hopping campaign, locals reported two or three elderly Japanese holdouts. Although searches of the mountains and jungle were conducted, no evidence was found. Most recently, in 2001, holdouts were reported on Guadalcanal, but again no concrete evidence has been discovered since the last Japanese surrendered there in 1947. Many Japanese soldiers undoubtedly remained in hiding throughout Asia and the Pacific into the 1970s and they were never found. Perhaps a few managed to survive into more recent times until disease, accidents or old age carried them off. We may never know the full extent of the Japanese holdouts phenomenon, nor fully understand why Japanese soldiers behaved as they did, but clearly the Japanese soldier remained a formidable, tough and single-minded adversary, even many decades after defeat.

International Media Coverage for Zero Night

Just a few of the fantastic press articles and features on Zero Night from around the world:

The Mirror: The Crate Escape

The New Zealand Herald: Kiwis’ over-the-top World War II great escape immortalised

The Daily Mail: Douglas Bader’s great escape from the Nazis to be made into a movie

The Scotsman: New book reveals even greater WWII ‘Great Escape’

Kirkus: Zero Night by Mark Felton

The Blaze (US): Unsung Nazi Prison Camp Escape May Have Been the Boldest Breakout During World War II, Book Claims

**NEW** ZERO NIGHT PAPERBACK

Zero Night Paperback

Paperback version of Zero Night now available in all good bookshops and at Amazon

Zero Night Paperback

Nominated for the 2015 Kirkus Prize for Non-Fiction

NEW BOOK – THE SEA DEVILS

The Sea Devils

Operation Struggle and the Last Great Raid of World War Two

“The author of Zero Night with another tale of Second World War derring-do.” The Bookseller

The Sea Devils Final Cover

Hear Mark discussing the book on BBC Essex: Tony Fisher Show

July 1945. Eighteen daring young British, Australian and New Zealand special forces from the top-secret underwater warfare unit known as The Sea Devils prepare to undertake three simultaneous and incredibly risky missions against the Japanese. Using four brilliantly conceived XE-craft midget submarines, the raiders will creep deep behind Japanese lines to sink two huge warships and sever two vitally important undersea communications cables. If any of the Sea Devils are captured they can expect a gruesome execution.

Mark Felton expertly tells the incredible tale – the last great Allied raid of the war – of how this band of young men living on raw courage, nerves and adrenalin repeatedly combat Japanese defences, oxygen poisoning and calamitous submarine disasters to pull off a brilliant display of ingenuity, courage and sheer guts, on missions that earn the last Victoria Crosses of World War Two and ensure final victory over Japan.

Hear an audio clip from The Sea DevilsAudio Download

Hitler’s Eagle’s Nest: Then & Now

Check out my Youtube film on the Berghof and other ruins above Berchtesgaden: Obersalzberg – Hitler’s Mountain Hideaway

Hitler’s Eagle’s Nest

The Obersalzberg is a small mountain that lies just outside the pretty Alpine town of Berchtesgaden on the Bavarian-Austrian border. From 1933 to 1945 Adolf Hitler owned a house on the mountain called the Berghof. Over several years, Hitler’s loyal subordinate Martin Bormann gradually took over the Obersalzberg area, evicting its farmers and pulling down the original properties. In their place was created a carefully guarded Nazi village, where senior members of the regime had alpine chalets built close to their Führer. The site also included barracks accommodation for Hitler’s SS guards, service buildings, hotels for important guests, garages for the leaders’ huge armoured Mercedes limousines, tea houses (including the famous Eagle’s Nest), a kindergarten, cinema and a massive greenhouse to supply Hitler’s vegetarian dietary requirements.

As the war progressed, Hitler divided his time between his Eastern Front headquarters at Rastenburg, known as the Wolf’s Lair, the Reichs Chancellery in Berlin and the Obersalzberg. Eva Braun, the Führer’s mistress, lived almost exclusively at Obersalzberg throughout the war, until leaving for the Berlin Bunker. In April 1945, the Royal Air Force launched a devastating raid on the Obersalzberg, probably because, with its miles of bunkers and air raid shelters, it could have been used as part of the ‘Alpine Redoubt’, the semi-mythical last stand in the Alps planned by the SS. The British Lancasters devastated the Obersalzberg, damaging or destroying many of the Nazi properties. As Allied ground forces closed in on the village in early May 1945, the SS set fire to Hitler’s house and withdrew. In 1952, the shell of the Berghof was blown up by the Bavarian Government in an attempt to erase all traces of Hitler from the mountain. Today, extensive ruins of many important Nazi buildings remain scattered across the site, including some traces of the Berghof. A few buildings remain untouched by war and have survived the wrecking ball.

IMG_1816

Berchtesgaden Station, built to accommodate Hitler’s private train, the Führersonderzug, which was ironically named ‘Amerika‘ (later ‘Brandenburg‘), and the huge numbers of German civilians who wanted to visit the Berghof.

Hitler's train 2

IMG_1820

Closeup of the main entrance to Berchtesgaden Station. A huge swastika flag originally hung from the wrought iron flag pole on the left. Hitler had a separate private entrance/exit further along the building.

Hitlers train

IMG_3503

The main waiting room (above & below) inside Berchtesgaden Station, with its Nazi-era clock and wall murals.

IMG_3504

IMG_1834

A famous war mural in Berchtesgaden town centre. The same view (below)  on 4 May 1945, when US forces captured the town:

Berchtesgaden 1945


IMG_1833

IMG_1934

The Gutshof, an experimental farm built by Martin Bormann close to Hitler’s private house. Today its a golf course club house.

IMG_1936

Only the foundation remains today of the main SS guardhouse that originally blocked the main road up from Berchtesgaden (see image below). Beyond the wooden gatehouse was Hitler’s house, on a rise on the right.

WachhausBA

(Copyright: Bundesarchiv)

IMG_1858

Mark pictured amid the ruins of Hitler’s house, the Berghof. Today, only the house’s massive rear retaining wall remains intact. Hitler purchased the original property, Haus Wachenfels, in 1933 using royalties from Mein Kampf. Renamed ‘Berghof’, it was extensively rebuilt and enlarged (see below).

2

IMG_1861

Another shot of Mark by the Berghof’s east wing retaining wall. The site is rapidly returning to nature having been planted with trees

IMG_1913

One of the few remaining metal features extant at the Berghof, located on the Adjutancy side of the building. This shaft gave access to communications and electrical cables that ran from the house up and through the hill behind.

IMG_1940

The remains of the driveway that ran in front of the Berghof is visible in this photograph. A flight of steps on the left led up to the house’s entrance. See below for an original photograph looking down the steps to the same drive:

Berghof Drive


Hitler Berghof steps


Looking up the Berghof steps to the house’s main entrance. Note the large armoured Mercedes-Benz limousine to bring visitors from either Berchtesgaden Station or Salzburg Airport.

IMG_1880

The Hotel zum Türken, adjacent to the Berghof, which housed 19 of Hitler’s RSD bodyguards when he was on the Obersalzberg as well as a telephone exchange. It is now a private hotel.

NATIONAL ARCHIVE WASHINGTON 242-HB-48400-89 HOFFMAN COLLECTION: Adolf Hitler with earliest members of his personal bodyguard unit, the SS Begleit Kommando: Bruno Gesche on Hitlers immediate left, Erich Kempka on Hitlers immediate right, Adolf Dirr, August Koerber, Franz Schaedle.
NATIONAL ARCHIVE WASHINGTON 242-HB-48400-89 HOFFMAN COLLECTION: Adolf Hitler with earliest members of his personal bodyguard unit, the SS Begleit Kommando: Bruno Gesche on Hitlers immediate left, Erich Kempka on Hitlers immediate right, Adolf Dirr, August Koerber, Franz Schaedle. Photographed at the Wolf’s Lair.

IMG_1872

The Hotel zum Türken taken from the entrance to the Berghof’s drive. On the left of the road opposite the Hotel is the ruin of the Unterwurflehen, the Obersalzberg administration building. A path runs from here to the Mooslahnerkopf Tea House.

IMG_1888

The extensive SS bunkers beneath the Hotel zum Türken. These connect to Hitler and Eva Braun’s air raid shelter that still exists beneath the Berghof ruins, but it is not open to the public.

IMG_1895

Machine gun positions guarding a passageway beneath the Hotel zum Türken.

IMG_1881

Some parts of the bunkers beneath the Hotel zum Türken look almost unchanged from World War II.

IMG_1882

Three wood lined cells are located on the first subterranean level beneath the Hotel zum Türken where the RSD could hold suspects caught within the forbidden ‘Führer Security Zone’, or perhaps SS men or other employees for disciplinary reasons. The cells are charred in places by the fire that resulted from the RAF bombing in 1945.

IMG_1903

Shrapnel damage from an American bazooka round that was fired into the bunker beneath the Hotel zum Türken in 1945.

IMG_3576

IMG_1911

IMG_1912

Mark outside the entrance to Hitler’s private bunker beneath the ruins of the Berghof. Beyond the bricks is a long, curving white corridor with a series of rooms on the right, including those for Hitler, Eva Braun and Hitler’s physician, the corpulent and repulsive Dr. Theodor Morell. Apart from the retaining walls above ground and the driveway wall, this is the only part of Hitler’s house still surviving – though frustratingly closed to inspection!

IMG_1870The remains of the drive that once swept up to the front of the Berghof. Today, only a short section of wall survives on the left, and a few patches of the original surface among the trees that have been planted all over the site.

A similar view during Hitler’s time (below). The driveway wall can be seen in both images.

hitler-berghof-obersalzberg-1

IMG_1869

A closer view of the drive’s retaining wall, its large stone blocks still in position.

IMG_1915

The retaining wall to the Adjutancy wing of the Berghof, where Hitler’s many military adjutants and aides were accommodated.

IMG_1857

The present day view out through Hitler’s giant picture window at the Berghof, now long since destroyed. The Berghof site has had many tons of rubble from the demolished Platterhof Hotel dumped over it. But the bunkers beneath the house remain intact, though inaccessible.

The same view through the window during the war (below):

berghof-view-picture-window-color-hoffmann

4

In the photograph above of the interior of the Berghof, the picture window would have been to the right, in front of the desk.

IMG_1947

The back retaining wall of the Berghof, directly behind the main part of Hitler’s house. Around the corner on the left, where the wall slopes down, was the Adjutancy wing.

Berghof 1945

The bomb-damaged Berghof on 4 May 1945, when US forces arrived to claim possession. The building was still smoking after the SS guard unit set fire to the house before retreating.

IMG_1957

The rather creepy path through the forest that Hitler walked every day that he was in residence at the Berghof to the Mooslahnerkopf tea house. The entrance to the original path has been made deliberately difficult to locate today by the Bavarian Government, but leads to the intact viewing area opposite the tea house ruins that has featured in so many photographs of Hitler. The woods are dark and gloomy, and it appears that few people come here today.

(Below) Hitler and Heinrich Himmler walking the same one kilometre path from the Berghof in the winter of 1943:

Hitler1943

IMG_1966

To the left of the path is the small hillock atop which stood the Mooslahnerkopf Tea House, with the famous lookout and its wooden railing to the right.

IMG_1971

The Mooslahnerkopf overlook taken from atop the ruins of Hitler’s favourite tea house. The same view (below) during the war:

Hitler Moos


berghof-hitler-blondi-view-hoffmann

Moosl

Built in 1937, only the foundations of the Mooslahnerkopf Teahouse remain today.

For a more detailed article and more photographs then and now of the Mooslahnerkopf see my article here: The Fuhrer’s Forgotten Tea House

IMG_1919

The Göring Adjutanter, the building that once housed Hitler’s senior Luftwaffe adjutant, General der Flieger Karl Bodenschatz and his staff. Now a private home, this building survived the fate of Hermann Göring’s house next door, which was pulled down in 1952. It gives a good impression of what many of the other properties in the area would have looked like during the war.

Goering Ruins


Reichsmarschall Hermann Göring’s house in ruins after the RAF bombing of the Obersalzberg, April 1945.

IMG_2367

IMG_1927

Mark inside Martin Bormann’s complex of bunkers beneath the Hoher Göll Guesthouse, now the Obersalzberg Dokumentation. The Hoher Göll is just around the corner from the Berghof and was used to house visiting dignitaries. Today, only the ground floor survives with a modern upper floor, as well as the extensive bunkers that link in with the old Platterhof Hotel complex’s massive subterranean world.

IMG_1930

IMG_1920

This large chamber beneath the Platterhof Hotel housed electrical generators that powered the utility systems for the bunker complexes.

IMG_1926

A huge safe lies face down on the floor of an office in the Bormann bunker complex. The hole in the back was made by Allied troops trying to open it in 1945 using a bazooka! The rooms, like this, that run off a massive central corridor, were designed to be used by Nazi Party officials housed in the Hoher Göll Guesthouse above. It would have formed a last-ditch Nazi HQ.

IMG_2377

IMG_2365IMG_1933

IMG_1986

Remains of the driveway that led to Martin Bormann’s House.

IMG_1987

The entrance to the bunker system, opposite the Hotel zum Türken, for the Obersalzberg anti-aircraft defence and communications centre. It connects to the Hotel zum Türken, Berghof and Bormann Haus bunker systems.

IMG_1993

The Hotel zum Türken with its intact SS guard post that controlled access to the Berghof, located behind and to the left of the Hotel. Originally, there was a wooden gate extending across the road on the right of the picture, blocking access to the Berghof, which stood just around the corner on the left.

The same view (below) when the SS were in residence:

Hotel zum Turken

IMG_1917

SS gatehouse (with modern roof) that used to guard one of the entrances into Sperrkreis 1, the innermost security zone around the Berghof and other top Nazis’ houses. The road leads up Kehlstein Mountain to the Diplomatic Reception House, more commonly known by its nickname of “The Eagle’s Nest”.

IMG_2363

IMG_3568

All that remains of the main Platterhof Hotel today is the long wall on the left. The area is now used as a bus station for the Eagle’s Nest (pictured on Kehlstein Mountain above). The path towards the photographer leads to the former Hoher Göll Guesthouse (now the Obersalzberg Dokumentation) and then the Berghof.

OB Dokumentation

The former Hoher Göll Guesthouse today, with its top floors chopped off and converted into the Dokumentation Obersalzberg. (Photo: www.mapio.cz)

Hoher Goll

The Hoher Göll Guesthouse during the war, with SS sentry post guarding the path that ran past it round the corner to the Berghof. The Guesthouse was used to house senior visiting dignitaries, and latterly was taken over by Martin Bormann as offices. It survived the 1945 air raid intact, though was later extensively looted.

IMG_1984

One of many bomb craters that litter the Obersalzberg site dating from the 25 April 1945 air raid by RAF Lancasters. The size of each gave a great indication of the damage that they must have caused. This one photographed by Mark adjacent to the Unterwurflehen Administration Building.

photo-21

Mark pictured with a Lancaster at the RAF Museum, Hendon. The 25 April 1945 raid on the Obersalzberg was massive, consisting of 359 of these huge bombers, the same number used to flatten the city of Kiel ten days previously. The British were making sure that the Obersalzberg complex would be completely denied to Hitler and the SS.

IMG_1949

Another deep, water-filled bomb crater from the 1945 raid, close to the path that Hitler would walk to the Mooslahnerkopf Teehaus.

IMG_1950

Tin roofing material that I discovered piled on the ruins of the Unterwurflehen Administration Building just across from the Berghof. This building, located between Martin Bormann’s House and the Berghof, was headquarters for the administration of the Obersalzberg Complex. SS-Sturmbannführer Spahn lived here with his staff. Extensive brick ruins were visible, as well as pipework and the remains of a formal garden. A huge bomb crater was immediately adjacent from the 1945 air raid.

IMG_1951

IMG_1989

The site of the SS-Kaserne, the large barracks complex that housed Hitler’s guard troops on the Obersalzberg. The building has been completely erased, including the underground rifle range, the grounds now forming part of the new Intercontinental Hotel complex.

IMG_1990

Hitler’s Eagle’s Nest sits high above the Obersalzberg on Kehlstein Mountain.

IMG_1771

The Eagle’s Nest photographed from the summit of adjacent Jenner Mountain. Eva Braun was a frequent visitor to the building, and it was here in 1944 that her sister Gretl married Hitler’s SS liaison Gruppenführer Hermann Fegelein.

Operation Foxley

British Special Operations Executive (SOE) conducted detailed planning and training concerning assassinating Hitler on the Obersalzberg. The plan was to parachute in two highly-trained snipers, one British and one a German-speaking Pole, who would hide up in a safe house in Salzburg. The pair, disguised as German mountain troops, would then infiltrate the security perimeter around the Berghof and shoot Hitler dead during his daily walk to the Mooslahnerkopf Tea House. Hitler left the Berghof for the last time in July 1944, before the operation was ready to be launched.

IMG_0089


The pair were to be armed with Mauser 98K rifles fitted with telescopic sights, and each man would carry modified 7.65mm silenced Luger 08 pistols (above). The pistol in the photographed is the only known surviving weapon from Operation Foxley and I photographed it at the excellent Combined Military Services Museum in Maldon, Essex.

See also: Adlerhorst – Hitler’s Forgotten Headquarters

For more information about fascinating private world of Adolf Hitler, please see Mark’s recent book:


Copyright Mark Felton, 2015, all rights reserved